If you’re looking to get your television up and running, here’s how to scan channels on a Haier TV if you plan to use an antenna signal to pick up an over-the-air broadcast.
You have to run a channel scan on a digital TV before you can watch. It’s not like the days of analog where you just hook up the rabbit ears (antenna) and channels automatically appear.
It doesn’t matter whether you have an older model of Haier TV or a newer one since the process of setting up the auto channel search is generally the same.
Remember, you don’t need to go over these steps if you plan to use your Haier TV with either a cable, satellite provider or streaming device via one of the HDMI ports.

1. Position the antenna properly
First, make sure the antenna is positioned correctly (aimed in the direction of the broadcast towers in your area). You can always adjust this later but I recommend doing this first.
2. Connect the antenna to coax, then to the TV
If this is your first time hooking up a Haier TV, don’t worry. It’s easier than you might think. If your television is using an external antenna, all you need is a coaxial cable, also known as “coax.”
Simply connect the antenna to the coax cable, and then screw it into the back of the set. The port located on the back of your television is often labeled RF on most Haier televisions.
If you need more information on where to connect the antenna to your particular Haier television, take a look at the diagram that came with your new television set.
Be sure the connection is secure. Once you’ve done that, the hardest part is over.
3. Select “TV” as the input source
Once you’ve connected the cable from your antenna to the coax port, you’ll need to select “TV” as the input source. To do this, press the INPUT button on the remote control.
If for some reason, you don’t have the universal remote control available, you can use the buttons on the television, either on the left side or right side of the TV.
Select “TV” from the list of different options available. This is the correct input source if you want to receive free over-the-air broadcast television channels in your area.
4. Start the “Channel Scan” process
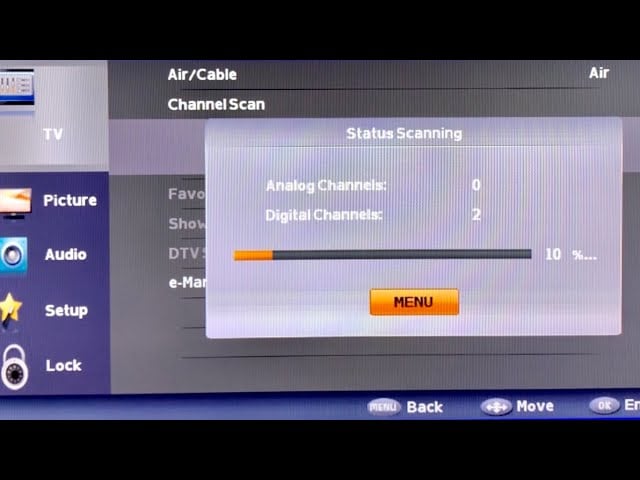
Once you’ve selected “TV” as the input source, press the MENU button on the remote control. On the TV menu window, use the arrows on the remote control to change from “Cable” to “Air”.
Next, you need to perform a “Channel Scan” so your TV can display the channels in your area. Use the down arrow on the remote control to navigate to “Channel Scan” and press OK.
On some models, the option may be named “Auto Scan” instead.
Your Haier TV will scan for available channels and will automatically store them. Depending on the number of channels available in your area, the scan process can take about four minutes.
Once the progress bar reaches 100% the scan process is complete. You can now use the remote control’s channel up and down buttons to cycle through the available channels.
The “Channel Scan” process is required to allow Haier TV to identify the available channels. Without going through these steps, you won’t be able to watch free over-the-air channels.
5. Adjust the antenna if the picture is pixelated
If the picture on your Haier TV is pixelated (breaks up into tiny blocks), it means that the signal is marginal. You’ll need to adjust the antenna to fix the issue.
Alternatively, if the list of channels is not complete, try adjusting the antenna position and re-running the channel scan process one more time.
An internet resource you might want to consider is AntennaWeb. This site will provide a listing of all the over-the-air HD channels in your area based on your address and zip code.
It will also provide you with information on how to set up any directional information that might be required for improving the reception in your area. Good luck.
Related articles:
The post How to Scan Channels on Haier TV (Complete Video Guide) appeared first on Tech Anoa.